If your website is hosted with Accurate Expressions, 24 hour support is available free of charge via SureSupport, our hosting support portal who provide hosting-related technical support services with a super-fast turn around time.
15 minutes response time guaranteed
SureSupport replies to each support ticket within 15 minutes of its posting … Guaranteed!
Be as descriptive as possible when you log your ticket. Saying “it’s not working” isn’t very helpful. Here’s a list of extremely helpful things to note in a support ticket:
listing the exact steps you took to get to where you ran into the issue
screenshots that include the URL of the page you are on
screenshots of error messages (or copy and paste the error message into the ticket description)
what were you expecting? what happened instead?
what browser were you using – Firefox, Chrome, Safari? (if you were using Internet Explorer, then I’d highly recommend downloading a different browser and never using IE ever again!)
are you on a PC or a Mac?
All of these things (and more) are helpful for the person who is diagnosing the issue!
Upload screenshots or use something like snipboard.io to share a screenshot via link
New email addresses can be created via Mail Manager in your Control Panel. Full instructions are available at SureSupport via the “More at SureSupport” button at the bottom of this page.
Your mailboxes have been created, and your temporary passwords have been sent to you via text message. The next step is to add your email account to all your devices.
NB: if you’ve recently migrated your site, keep reading! The process is similar and you’ll need the same information, but you’ll be updating your devices, rather than creating new email accounts.
Information you’ll need
You’ll need the following information, all of which can be found in your Welcome Email or via your Control Panel.
Your email address any mailboxes created by us will be listed in your Welcome Email – NB: Your user name is the same as your email address!
Mailbox password passwords for any mailboxes created by us were sent to you via text message
Your domain name well, you know this already!
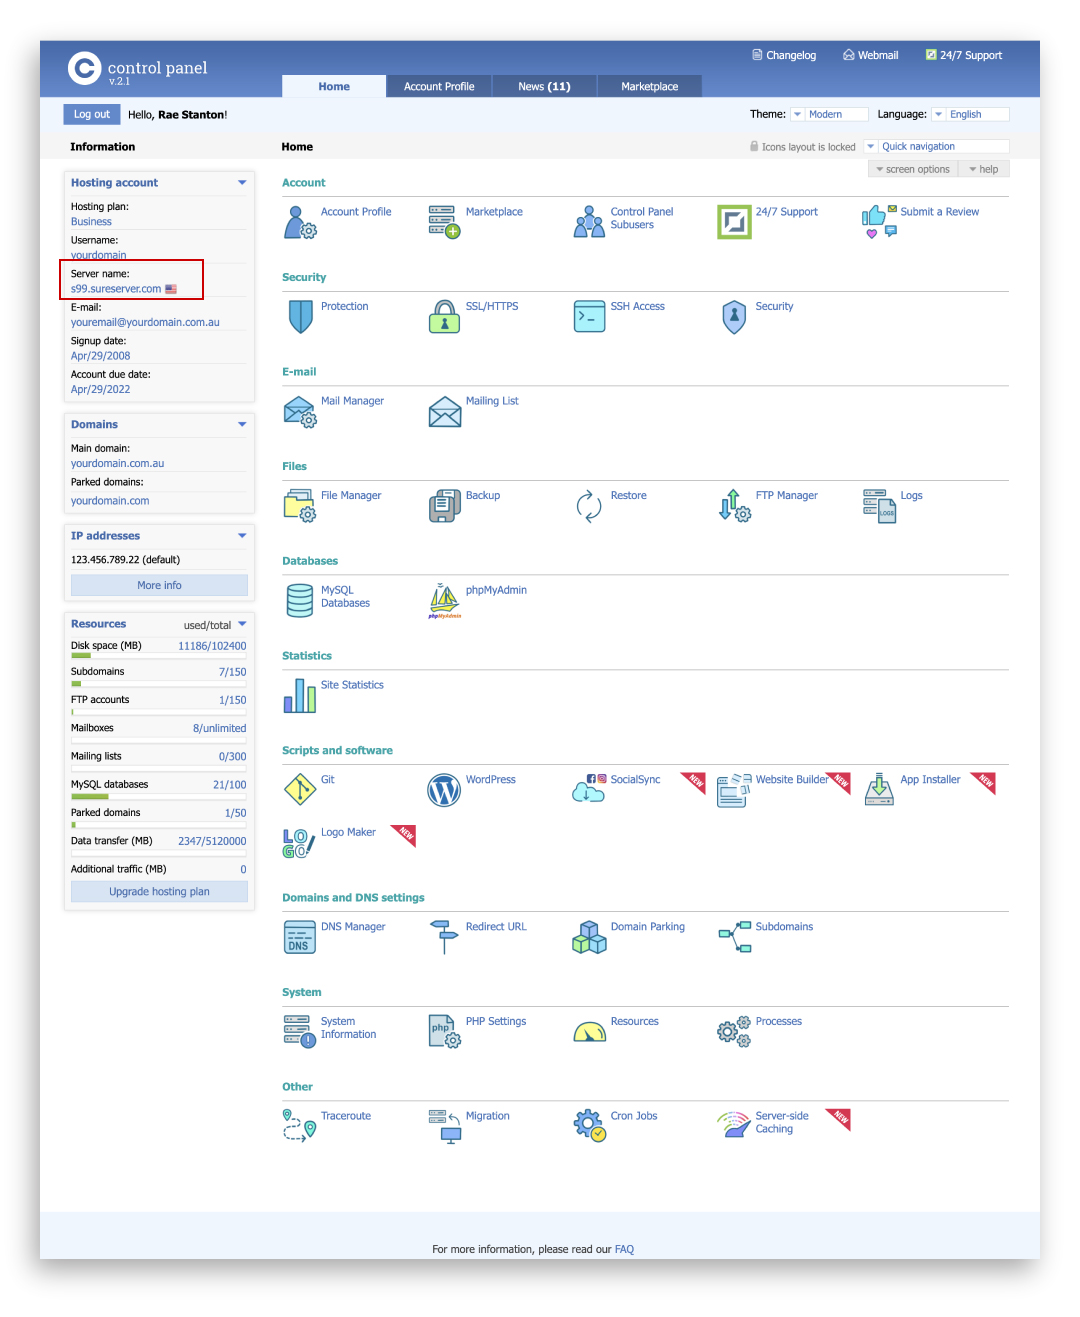
Your server’s host name you can find this in the top left corner of your Control Panel
Incoming and Outgoing Mail Server details click on Mail Manager, then scroll to the bottom of that screen
Configure your email program
The following instructions are for setting up your email address on your devices.
NB: If you’ve recently migrated your site, instead of creating a new email account on your device, you’ll update the incoming and outgoing mail server details and your password, but the configuration screens in the instructions are basically the same.
Once you’ve gathered the required information, open the instructions here then select the relevant email program:
On the following screen, select the IMAP & SMTP over SSL option:
Throughout these help articles you will be referred back to your Welcome Email. This is the email we sent you when we first created your hosting account. It looks like this:
NB: If you need to search for it in your Inbox, use the string “Welcome: Your hosting account for”.
So you’ve started your free trial* with Squarespace, where do you go from here? The best thing to do is familiarise yourself with the platform, and the best place to do that is in the Squarespace Help Center.
*If you haven’t set up your free trial yet, contact Rae to take advantage of a 6 month free trial!
Squarespace Help Center
The Building your first Squarespace site article covers the basics of creating your site’s structure, adding content, editing your site’s styles and how to publish. From there, you can access other helpful articles in the Getting Started section
If you’d like more specific assistance, you can book in for one-on-one training with Rae. It’s best to review the articles mentioned above and have a bit of a play around in Squarespace prior to your training session. Even better … have a list of things you want to learn more about!
Coupons are a great way to offer discounts to your customers! It’s super easy to create a coupon in WooCommerce. NB: Coupons recently moved from the WooCommerce section, to the Marketing section.
From your WordPress Dashboard, select Marketing >Coupons in the left sidebar
Click the Add coupon button
Enter your Coupon code – this is what the customer will enter at checkout (NB: coupons are NOT case sensitive). Alternatively, you can click the Generate coupon code button to auto-create a code.
You can enter a description if you want, this is only for internal use, eg, 10% off storewide, 1 coupon per customer etc
In the Coupon data > General section:
Select your Discount type
Percentage discount: A percentage discount for selected products only. For example, if the cart contains three (3) t-shirts @ $20 each = $60, a coupon for 10% off applies a discount of $6.
Fixed cart discount: A fixed total discount for the entire cart. For example, if the cart contains three (3) t-shirts @ $20 each = $60, a coupon for $10 off gives a discount of $10.
Fixed product discount: A fixed total discount for selected products only. Customer receives a set amount of discount per item. For example, three (3) t-shirts @ $20 each with a coupon for $10 off applies a discount of $30.
Enter your Coupon amount: this will be a percentage or a dollar amount depending on which Discount type you’ve selected
If you want to allow free shipping, check the Allow free shipping box. NB: see note about enabling a free shipping method
Set the Coupon expiry date. NB: coupons expire at 00:00 on the date entered, eg, if you set the expiry date to 20 July 2021, it will expire at the very start of 20 July 2021, and will no longer be valid during that day and beyond.
In the Coupon data > Usage restriction section:
Set your Minimum spend and Maximum spend if required
Check Individual use only if the coupon can’t be used with other coupons
Check Exclude sale items if the coupon can’t be used on sale items
You can include or exclude certain products and/or categories by adding them to the Products, Exclude products, Product categories, and Exclude categories fields. Leave these fields blank to apply the coupon to your entire shop.
If you want to restrict the coupon to certain emails, enter those in the Allowed emails field
In the Coupon data > Usage limits section:
Set Usage limit per coupon eg, to limit the coupon to the first 100 customers, enter 100 in this field
Set Limit usage to X items if you want to limit the coupon to a certain number of items, eg, if you set this to 5 and the customer adds 6 items to their cart, the coupon will only apply to the first 5 items. Leave blank to apply coupon to whole shop.
Set Usage limit per user if you want to limit the coupon for individual customers, eg, if you set this to 1, the customer can only use the coupon once.
Click Publish to save your coupon
IMPORTANT: TEST YOUR COUPON prior to advertising it! Visit your shop, add some products (include products that have been excluded, add more products that your limit, add sale items etc) then enter your new coupon at checkout.
Child themes … it’s a thing … use them! There are a lot of great articles already out there that explain what a child theme is, why you should use them and how to set one up. This article on Smashing Magazine By Nick Schäferhoff is my go-to: How To Create And Customize A WordPress Child Theme NB: Under “When to Use a Child Theme” Nick says “So, should you always build a child theme … ? No, it really depends.” … I disagree … I think you should always use a child theme.
As great as Nick’s article is though, I thought I’d give you a condensed, step by step process to simplify it even further, for next time. I do suggest you read up on child themes first so you know what/why you’re setting one up, and that article from Smashing Mag is a great place to start.
Once you’ve got your head around that, here’s the cut-down version for quick reference (I’ll use the same headings so you can refer back to the original article for more info at any time): NB: I usually work with offline files, then load them via FTP to the webserver. Nick has a great suggestion to zip the theme folder then install it like a normal theme via the WordPress Theme menu … gold!
Set Up A Basic Child Theme
“… a child theme needs three things: its own folder, a style sheet and a functions.php file.”
Create a Folder in wp-content/themes
It can be called anything, but no spaces – something like “twentyfifteen-child” will work, and so would “myawesomewebsite”.
Create a Style Sheet
Create a new text file and call it “style.css” (you can use any text editor or you can be fancy and use Dreamweaver … do not under any circumstances use Word!)
Paste the style sheet header as follows:
/*
 Theme Name: Twenty Fifteen Child Theme
 Description: A child theme of the Twenty Fifteen default WordPress theme
 Author: Nick Schäferhoff
 Template: twentyfifteen
 Version: 1.0.0
*/
Activate Child Theme
Skip this step for now!
Create functions.php
Same as the Style Sheet, just create a text file and call it “functions.php” (these files are of course created in the theme folder we created earlier “wp-content/themes/myawesomewebsite/functions.php”
Copy the following code into the file (yep, that’s PHP … don’t worry, you don’t need to fully understand PHP to get this going, trust me!):
<?php//* Code goes here
Inherit Parent Styles
DON’T use the @import method … (this is the one thing I don’t like about the article, this is the old way of doing things so in my humble opinion, why mention it at all?!)
DO use the wp_enqueue_style() method … copy this code into your functions.php file (underneath the other bits we just pasted):
This guy allows you to search 47 websites from one place: librestock.com
These guys aren’t free, but their libraries are usually easier to search and generally larger which of course means more variety … so if you have the money and specific needs, you’ll most likely find what you’re looking for here (and no, I don’t get any kind of commission if you buy from them): istockphoto.com fotolia.com dreamstime.com shutterstock.com
If you want to go down the rabbit hole … take care … and we will see you on the other side …
Here’s a list of free stock libraries from Entrepreneur Magazine … with a bonus “Attribution and licenses explained” section: entrepreneur.com/article/238646
If you use WordPress regularly, you probably have a good handle on how everything works.
However, a little digging is required to access WordPress’ functionalities in full. You might not realize there are plenty of “hidden” WordPress features – some more hidden than others.
In today’s post, I’m going to uncover 20 of these hidden WordPress features, so that you can get the maximum from the world’s most popular CMS.
This post is primarily targeted at WordPress beginners. If, however, you consider yourself to be a WordPress dab hand, you might still learn something new or at least refresh your memory of commonly underutilized features.
There are two kinds of people in the world – those who have had a hard drive failure, and those who will. Make sure this common occurrence does not lead to the loss of your image collection.
He recommends keeping 3 copies of any important file (a primary and two backups)
He also recommends having the files on 2 different media types (such as hard drive and optical media), to protect against different types of hazards.*
1 copy should be stored offsite (or at least offline).
*While 3-2-1 storage is the ideal arrangement, it’s not always possible. A second media type, for instance, is impractical for many people in the ingestion or working file stage. In these cases, many people make do with hard-drive-only copies of their data. Best practices, however, still require 3 copies and some physical separation between the copies.