Set a username for your Facebook Page

NB: These instructions are specific to the New Pages Experience

To create a username for your Page:

  • Log into Facebook, then click your profile photo in the top right.
  • Click See all Profiles, then select the Page you want to switch into.
  • Click your Page’s profile picture in the top right.
  • Click Settings & privacy, then tap Privacy.
  • In the left menu, click your Page’s name.
  • Below General Page settings, click Edit next to Username.
  • Enter a username.
  • If the username is available, click Save changes.

How to create a new Page in Facebook

Facebook Pages are different to your Personal Profile. You can manage multiple Pages for multiple businesses, but you’ll only ever have one Personal Profile.

Create a new Facebook Page

  • Login to Facebook using your personal login details
  • On the home screen (the one you see when you click the Facebook icon in the top left corner) clickย See More at the bottom of the visible shortcuts underneath your avatar:
    Facebook Shortcuts | help from accurate expressions
  • Scroll down to click on Pages
    Facebook Shortcuts | help from accurate expressions
  • If you already manage some Pages you’ll see them listed under Your Pages and profiles:
  • Click + Create new Page
    Create new Facebook Page | help from accurate expressions
  • Follow the onscreen prompts to set up your new Page

Now that you’ve created your Page you may want to add other users as admins as well!

Connect your WordPress site to Google Analytics with MonsterInsights

There are hundreds of WordPress plugins for Google Analytics … I use MonsterInsights because it’s free, and it’s easy to use. You can use whichever plugin you like, but this article is specific to MonsterInsights!

Once you’ve installed MonsterInsights, and created your GA4 property, you’ll need to connect your WordPress site to your Google Analytics account. The easiest way to do this is add me as an admin on your Analytics account, and I’ll do the rest!

If you prefer to DIY, follow these steps:

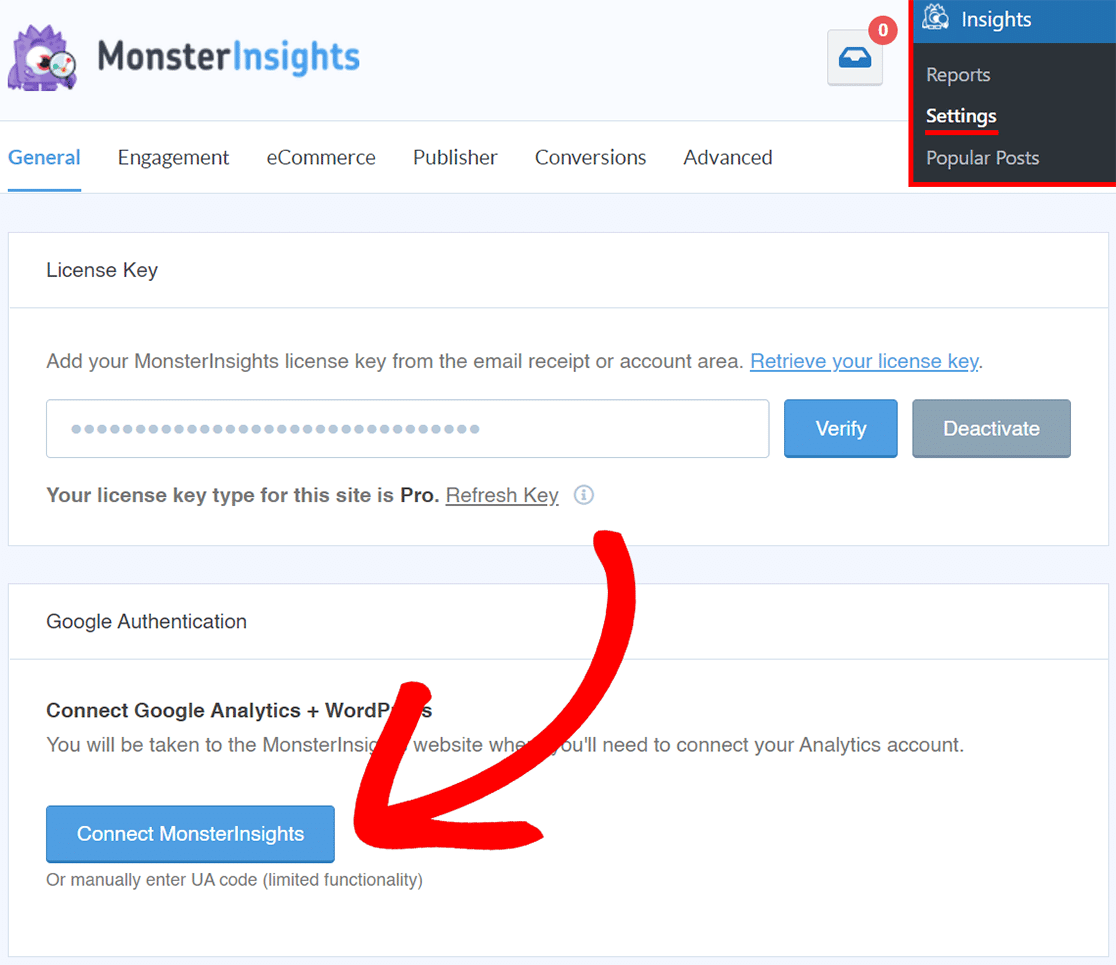
  • From your WordPress Dashboard, click on Insights > Settings in the left-hand sidebar
  • Click on the blueย Connect MonsterInsights button:
    connect to monsterinsights wordpress dashboard
  • You’ll then be prompted to choose which Google Account you want to login as (make sure you select the same account as your Google Analytics account!)
  • Click theย Allow button which gives MonsterInsights access to your Analytics account
  • Next you pick the relevant profile for your website from the drop down box
  • Clickย Complete Connection

All done! It can take up to 24 hours for MonsterInsights to display your data, so come back tomorrow, then clickย Insights > Reports to view.

Add a user to your Google Analytics account

Once you’ve created your Google Analytics account, you can add users, giving them appropriate permissions (more about permissions at Google). Before you start, make sure you have the email address they use to sign into Google products … which may be different to the one you email them on, best to ask!

Add a user

  1. Sign in to Google Analytics
  2. Click Admin, and navigate to the desired account/property/view
  3. In the Account, Property, or View column (depending upon whether you want to add users at the account, property, or view level), clickย Access Management
  4. In theย Account permissionsย list, clickย +, then clickย Add users
  5. Enter the email address for the user’sย Google Account
  6. Selectย Notify new users by email to send a message to the user
  7. Select the permissions you want
  8. Clickย Add

Video Call Instructions

Video calls with Accurate Expressions are run on the Streamyard platform. Please review the following instructions for joining. We recommend testing your settings prior to the set meeting time to ensure everything is working properly.

Before the video call

Make sure you have the following:

  • Aย laptop or desktopย with a webcam and mic.
  • A recent version ofย Chrome or Firefox.
  • A strong internet connection. Just like Zoom, you must have a strong internet connection for it to work well. If possible, connect to your router with an ethernet cable instead of using WiFi.
  • We recommend wearingย earbuds or headphonesย to prevent audio echoes.

Testing your settings

Follow these steps prior to the meeting to test your camera, mic and headphones:

  1. You can find the meeting link in your online calendar event. Click the link and youโ€™ll be taken to our virtual meeting room.
  2. Allow StreamYard to access your camera and mic.
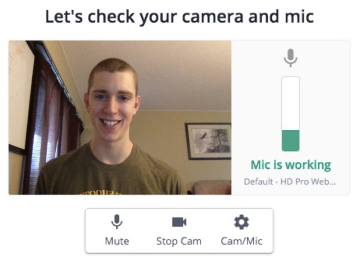
  3. Make sure you have the correct camera and mic selected.
    guest entrance settings
  4. Test your Click the wheel icon above Cam/Mic to open the Settings window.
  5. Click on Audio to test your mic and speakers/headphones.
    Streamyard Settings | help from accurate expressions
  6. Click theย X to close the Settings window
  7. Enter a display name … your actual name is all you need!

Joining the meeting

  1. When the time comes, click the Enter studio button.
  2. We will be informed that youโ€™ve arrived. You wonโ€™t be part of the meeting until we add you in. The page will update to let you know when youโ€™ve been added!

Resizing and compressing images for web

One of the most common questions I get when I’m working on someone’s website is “how big should my images be?”. Great question! The quick answer is as small as possible.

There are two things to consider – image size (eg, 1920×1080 pixels) and file size (eg, 5MB, 250KB etc). I usually resize images to roughly 1920×1080 pixels (or 1080×1080 pixels for things like instagram) and compress files down to about 200KB.

The main thing to remember is this – the bigger the file, the longer the image takes to load on your website. So in this case, small is best!

Most stock images you download will be fairly large (anything from 5MB upwards). In this video I’m using an image I downloaded from Unsplash as an example of how to resize and compress your image ready for use on your website. I’m using a free online tool called ImageResizer.com. You can do the same thing using loads of different free and paid apps, including Canva, Photoshop, TinyPNG … the concept is the same regardless of the app you use.

Need more help?

If you find this process to complex, I can resize and compress images for you.
Get in touch to discuss my rates.

Backup/duplicate your Squarespace site

Whilst Squarespace doesn’t have an inbuilt backup function, you can duplicate your site to create a full copy prior to making significant changes and/or giving access to someone else (perhaps me!). It’s a simple process which is done via your Squarespace Dashboard.

Accessing My Dashboard

  • Sign in to your Squarespace site
  • From the Home Menu scroll down til you see your Avatar at the bottom of the list
  • Click on your avatar to navigate to the My Dashboard page which lists all your sites (you may only have the one!)

Duplicate your site

  • Click on the three dots next to your site and selectย DUPLICATE WEBSITE
  • You’ll be prompted with a confirmation, click DUPLICATE to continue

  • You’ll see the duplication steps above your list of sites
  • When complete, you’ll see the duplicated site listed as Your Site Name (Copy)
  • Hey presto, you have a backup!

What version of Squarespace am I using?

Squarespace has evolved over the years … and each version works differently! Before you begin working with me, I’ll need to know which version your site is built on, and if it’s 7.0, what template you are using.

How to check your site’s version

  • Login to your website
  • From the Home menu, click Help:
    Squarespace | The Home Menu - Help
  • Scroll down to the bottom of the sidebar and you’ll see the version number and if it’s 7.0, the name of the current template:
    Squarespace v7.0 | help from accurate expressions Squarespace v7.1 | help from accurate expressions

Accordion Blocks

Accordion Blocks allow you to add information as a list of titles with clickable expandable text. They are an excellent way of displaying a lot of information in a small space, think FAQs, tech specs, and a variety of other lists.

Add an Accordion Block

  • Insert an Accordion Block by clicking the plus icon and selecting Accordion from the list:
    Add an Accordion Block | Squarespace | accurate expressions
  • By default, the Accordion block with have three items:
    Default Accordion Block | Squarespace | accurate expressions

Edit your Accordion Block

  • Text is added directly into the Settings window (not like editing a Text block!)
  • Click on Accordion Item 1 to edit to first section
    • Enter your Title
    • Enter your Description
    • Click BACK to return to the main Content window
      Edit Accordion Block | Squarespace | accurate expressions
  • Repeat for each section
  • Delete a section by clicking the red trash can icon
  • Add a new section by clicking ADD ITEM

Design your Accordion Block

  • Click on Design to edit the design of your Accordion Block:
    Design Accordion Block | Squarespace | accurate expressions
  • In the Design tab you can adjust the following settings:
    • Style for Title and Description
    • Expand the first item and/or allow for multiple items to be open
    • Turn Dividers on/off, set thickness and opacity
    • Change the icon image, style and placement
    • Adjust the row padding

Invite a contributor to your Squarespace site

At some point you may want to give someone access to your Squarespace site. For example, if you’re working with me, I’ll most likely ask you to add me as an Administrator. Inviting a contributor is better than giving out your personal login details for a number of reasons, the main ones being no need to give out your password, and when you’ve finished working together you can remove them quickly and easily.

Permissions

You can set different permissions for contributors:

  • Owner
  • Administrator
  • Billing
  • Website editor
  • Analytics
  • Comment moderators
  • Store manager
  • Email Campaigns editor
  • Viewer
  • Scheduling administrator
  • Scheduling view & edit
  • Scheduling view only

More info here: Squarespace permissions explained

Inviting a Contributor

To invite a contributor, you must be an Owner or Administrator of the site. Once logged in to your Squarespace site:

  • Click on the Settings cog icon in the bottom right corner of the sidebar
  • Click on Permissions & Ownership
  • Click on Permissions & Ownership
  • Click the INVITE CONTRIBUTOR button
    Invite Contributor | Squarespace Help from accurate expressions
  • Enter the name and email of your Contributor
  • Select the appropriate permissions
  • Click the INVITE button
    Invite Contributor | Squarespace | accurate expressions

Let your contributor know they will receive the following Contributor Invitation from Squarespace (make sure they check their Junk mailbox too!):

Contributor Invitation | Squarespace | accurate expressions

Edit Contributor Settings

Once the invitation has been sent, you will see their details on the Permissions page:

At any time (even before they have accepted the invitation) you can click on their name in the Contributors list and:

  • Update their permissions by turning toggles on/off
  • Copy the invitation link and send it to them manually (this is useful if your contributor didn’t receive their invitation):
    Invitation Link | Squarespace | accurate expressions
  • Cancel their invitation by clicking the three dots next to their name (before they’ve accepted the invitation):Cancel Contributor Invitation | Squarespace | accurate expressions
  • Remove permissions, and/or remove them altogether by clicking the three dots next to their name (after they’ve accepted the invitation):
    Remove Permissions | Squarespace | accurate expressions

Using a different website platform?

What is a favicon?

A favicon is the small icon that sits up in the tab of your browser window. It helps people find your website quickly in amongst the multitudes of tabs we often have open at the one time!

Favicon | accurate expressions

Adding a favicon is a small but important step. It adds legitimacy to your site and helps build trust and boost your online branding.

Claim your .au domain name

Have you heard the big news? Direct .AU domain names are coming to Australia! This means whereas previously you had to register under โ€ฆcom.au or โ€ฆnet.au, you can now register your desired domains directly under yourdomainname.au.

Why do I want to register a .au domain name?

  • For starters, it’s a shorter url, and everyone loves a short url!
  • Direct .au domain names are available to anyone with a verified connection to Australia.
  • Registering your exact match .au domain secures your branding by ensuring no one else registers it. It also ensures search traffic ends up on your site, not your competitors.

If you currently have domain names registered in the third-level .AU (e.g. yourdomain.com.au), this qualifies you to secure your second level .AU (e.g. yourdomain.au) domain before you lose your right on 20 September 2022.

This is an opportunity for you to secure your rights to an important digital asset.

NB: registering your matching .au direct domain is optional and has no affect on your current .com.au or .net.au domain.

Claim your .au domain name today
If you would like to register your .au domain, contact Rae today. You have until 20 September 2022.

Key Details

You have a limited window of 6 months between March 24 and Sept 20 2022 to claim your name(s). In the event you do nothing then that priority right disappears on Sept 20 and anybody worldwide will be able to register these domains.

In some cases, there may be more than one applicant for the same .au direct name.

For example:

  • You are the registrant of yourdomain.com.au
  • XYZ Company is the registrant of johndoe.net.au

In this case, both are eligible to claim yourdomain.au. You can still attempt to claim your matching .au, but your order will be processed based on The Priority Allocation Process.

What do I need to do?

Take action before 20 September. By claiming your name, you will also be able to use it immediately, helping you be ahead of the game and your competitors.

To secure your name today, contact Rae.

More information from auDA

auDA is the administrator of Australia’s .au top level domain.

.au direct

The .au direct launch

The Priority Allocation Process

Priority Status Tool

.au Direct Fact Sheet [PDF]


Claim your .au domain name today
If you would like to register your .au domain, contact Rae today. You have until 20 September 2022.

Add a link to jump to another section on a page (anchor link)

An anchor link is a link (or button) that allows you to jump to a specific section of a page (whereas a regular link will take you to the top of a page). It’s relatively easy to set this up, once you know how!

In this example, we’ll be making an anchor link to point to This section here on the Services page www.yoursite.com/services:

Squarespace Anchor Link | accurate expressions

Set your anchor link

The first step is to create the anchor. To do this, you’ll need to add a little piece of HTML code … don’t fret … it’s very easy!

  • Navigate to the spot you want to link to (the anchor)
  • Insert a Code Blockย above the block you want to link to (in this case, above the Text Block containing the “This section here” heading)
  • You’re going to add an empty <a> tag (which means it won’t display any text) that looks like this:
    Squarespace Anchor Link Code | accurate expressions
  • You’ll replace “this-section” with something that is meaningful to what you are linking to … don’t use spaces though! The name and id tags should be exactly the same. So your code might look like this:
<a name="myitem" id="myitem"></a>
  • Click outside the Code Block to save it

Set up your link or button

Next you’ll create a link using text or a button. For this example, we’ll create a button.

  • Navigate to the spot you want to add your link (it could be a different page)
  • Insert a Button Block
  • In the Link field, first select the page your anchor link is on by typingย  / and selecting, in this case,ย /services
  • Next, you’ll add a hashtagย # and then the name of the anchor link you created earlier (without the quote marks), for example, this-section
  • Your link should look like this:
/services#this-section
OR
/services#myitem
  • Click outside the Button Block to save it’

That’s it!

Adding/Editing Auto Layouts

Auto layouts allow you to display content in columns, rows, carousels, or slideshows. Add your content, then choose your layout!

NB: Auto layouts are Page Sections, not Blocks.

Add an auto layout

To add an auto layout section:

  • Clickย Edit to edit your page
  • Clickย Add Section
  • Choose a List, People, or Headlines section, then look for the i icon in the right corner of the sections (theย i indicates an auto layout!)
    NB: It doesn’t really matter which auto layout you choose, as you can edit the design to suit your needs, but it does help to start with something close to what you’re looking for

    Auto Layouts – List
    Auto Layouts – People
    Auto Layouts - Headlines
    Auto Layouts – Headlines

NB: All auto Layouts are added with dummy text

Edit an auto layout

  • If you’re not already editing your page, clickย Edit
  • Click the Edit Content button next to the standard section icons in the top right corner to add/edit auto layout content

Elements

Use this tab to toggle on/off what is displayed for the section and individual items.

  • Section – Title display a main section title above the individual items
  • Section – Button display a button for the whole section below the individual items
  • Items – Show Image display an image for each item
  • Items – Show Title display a title for each item (different to the section title)
  • Items – Show Body display body text for each item
  • Items – Show Button display a button for each item (different to the section button!)

Content

Use this tab to add/edit the content for the section as well as each individual item.

  • Clickย Title to add a section title
  • Clickย Buttonย to add a section button
  • Click an item in the list to add/edit content
    NB: if you’ve disabled an element, you won’t see it in the editor

    • Upload an Image
    • Set Image Alt Text
    • Add aย Title
    • Add a Description
    • Addย Button Text
    • Add a link for the button
    • Click < BACKย to save the item content


  • Repeat for each item
  • Clickย ADD to add a new item
  • Click the Bin icon to delete an item
  • Click and drag the 6 grey dots to the left of the item to reorder items

Design

Use this tab to change the design of your auto layout. Choose fromย one of three layouts:

  • Simple List displays items in a row from left to right. You can set the numberย  of columns which may shift some items to subsequent rows.
  • Banner Slideshow displays one item at a time with elements overlaying the main image. Visitors click arrows to scroll through each item.
  • Carousel displays items in a row from left to right, in a rotating carousel. Visitors click arrows to scroll through each item.

Each layout has its own settings allowing you to customise the display further.